A User’s Guide to a Safe Installation and Maintenance of Laboratory Centrifuge

What is a laboratory centrifuge?
A laboratory centrifuge is used to separate fluids based on density. It is a common laboratory equipment used to separate heterogenous mixtures according to the size, shape, and viscosity of the medium. Centrifuges are commonly used in diagnostic laboratories and hospitals primarily for blood or urine testing and DNA and RNA pelleting.
The two main types of centrifuges are micro centrifuge and tabletop centrifuge. The main function of both types is to separate samples contained in a vessel by means of high-speed rotation. Micro centrifuge and tabletop centrifuge differ in the types of rotors used and the sample capacity.
What are the common applications of a lab centrifuge?
The centrifugal force (g-force) generated by a centrifuge motor isolate suspended particles from their surrounding medium on either a batch or a continuous-flow basis. There are various applications for centrifugation which may include sedimentation of cells and viruses, separation of subcellular organelles, and isolation of macromolecules such as DNA, RNA, proteins, or lipids.

How to properly install a laboratory centrifuge?
Proper installation ensures the optimum performance of any equipment. Follow the guidelines below to correctly install a centrifuge and maximize its operation.
Location Requirements
- The centrifuge must be placed on a level table or bench that can support the total weight of the unit and accessories.
- Place the centrifuge near an electrical outlet matching the unit’s nameplate requirements.
- Allow 30 cm clearance on each side of the unit.
- Do not place the lab centrifuge next to a window or heat sources as this may affect the unit’s performance.
Environmental Requirements
- The centrifuge is for indoor use only.
- Ambient temperature: 2°C up to 35°C
- Max. relative humidity 90% temperature up to 31°C
Installation Requirements
- Using a grease-free cloth, clean the drive shaft and rotor shaft. Place the rotor into the drive shaft.
- Ensure that the rotor fixing screw is tightened before each run.
-
Rotors must be loaded symmetrically and equally.


- Do not operate the centrifuge with rotors or adapters that show signs of corrosion or mechanical damage.
- Do not operate with extremely corrosive substances that may damage the rotor and bucket.


How to safely operate a laboratory centrifuge?
Safe operation of a high-speed centrifuge prevents accidents, reduces damage, and minimizes occurrence of serious injuries. Here are a few important guidelines to remember:
- Ensure that centrifuge bowls and tubes are dry, and the spindle is clean.
- Do not use rotors and accessories that don’t match the rotor of the centrifuge manufacturer.
- Inspect the sample tube for the presence of cracks, splits, or other damage before use. Replace once damaged.
- Avoid overfilling the tubes.
- Always use centrifuge safety cups with aerosol covers to contain spills and aerosols of potentially infectious materials.
- Ensure proper and tight installation of rotor in the driveshaft.
- Do not exceed the rotor’s maximum run speed.
- Do not leave the centrifuge unattended. Wait until the centrifuge is at the desired speed/rcf setting and observe any unusual noise or excessive vibration especially upon system start-up.
- Close the centrifuge lid during operation.
- In case of spillage, wait for 10 minutes after the rotor stops before opening the lid. Decontaminate the centrifuge with 70% ethanol or 10% bleach solution afterward.
- Only properly trained personnel can check the O-rings on the rotor.
- Make sure that the centrifuge is in good condition after use.
- Schedule regular preventative maintenance.
What are the proper maintenance procedures for a laboratory centrifuge?
Poor maintenance of centrifuges will result in inefficient lab operations and can cause various physical and exposure hazards. Proper servicing and routine cleaning based on the manufacturer’s recommendations are vital in maintaining a safe working environment for laboratory personnel.
Table 1. Scheduled Maintenance
| No. | Description of Task to Perform | Maintenance to be carried out | |||
|---|---|---|---|---|---|
| Before using | After using | As needed | Yearly | ||
| 1 | Check if all components of the unit are grease-free and damage-free. | ✓ | |||
| 2 | Maintenance procedure including cleaning of rotors and accessories. | ✓ | |||
| 3 | Lubrication of the rotor insert bolts and lid thread. | ✓ | |||
| 4 | Autoclaving and sterilization | ✓ | |||
| 5 | Removal of adherent dusts from the ventilation slots of the centrifuge. | ✓ | |||
| 6 | General inspection | ✓ | |||
| 7 | Testing of speed and temperature (if applicable) | ✓ | |||
General Maintenance
Before using the unit, check if the following are not greased and damage-free: lid lock, motor shaft, and rotor. Do not operate the centrifuge with rotors or adapters that show any signs of corrosion or mechanical damage.
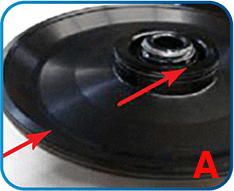
Apply a thin layer of rotor grease to the lid thread on the fixed-angle rotor (see Figure A).
In swing-bucket rotor (see Figure B), apply a thin layer of grease to the rotor bolts if it does not swing freely every after cleaning and autoclaving. Ensure that the rotor cross pivots and the bucket grooves are free from contamination. Also, ensure to grease the sealing of bucket caps regularly and the lid is tightly sealed.

Annual general inspection is recommended for optimum operation. Check the following regularly:
- Tightness of screw hinges, sight glass, and rotor lid.
- Functional check of the operating panel and device control including emergency switch.
- Electrical safety check in accordance with the relevant regulations.

The speed and temperature can be calibrated or tested to reference instruments. It is recommended to calibrate at least once a year to ensure continuous and optimal performance of the centrifuge.

Cleaning Procedure
Cleaning of unit, rotors, and accessories
Before cleaning and disinfecting, make sure to turn off the device and disconnect the power supply. Do not pour liquids inside the interior. Clean the chamber, rotor, adapters, and external surfaces daily after use with a soft cloth soaked in pH-neutral detergents only. Ensure that all parts are dried thoroughly. Coat anodized aluminum parts with anti-corrosion oil regularly to increase their lifespan and reduce corrosion predisposition.
Autoclaving and sterilization
In case an infectious material spilled in the centrifuge, the rotor and rotor chamber must be disinfected right after the run. Before autoclaving, the materials must be carefully washed with distilled water. The recommended time for autoclaving is 12-20 min at 121°C (1 bar). Adapters, tubes, and rotors can be sterilized with ethylene oxide. Afterwards, apply enough airing on the items before reusing.
Dust Removal
Removal of adherent dusts from the ventilation slots of the centrifuge every six months using a soft brush.

How to work safely with a centrifuge
The initial step in securing lab personnel is understanding the hazards, risk, and utilizing a combination of the appropriate safety equipment and procedures. Lab personnel should learn and strictly follow preventive measures to reduce damage and minimize occurrence of serious injuries. Here are a few important guidelines for operating a centrifuge:
Before the run
- Secure that the rotor is properly and tightly seated on the driveshaft.
- Inspect seals regularly for deterioration and decontaminate the inside and outside of the cups or buckets.
- Pre-cool your centrifuge first before the operation starts when handling temperature-sensitive samples like proteins, blood, and urine.
- Weigh the samples and balance the tubes in the rotor/buckets.
- Do not use rotors and accessories that do not match the rotor of the centrifuge’s manufacturer.
- Do not overfill the tubes.
During the run
- Close the centrifuge lid during operation and do not open the lid while the rotor is still running.
After the run
- Make sure that the centrifuge is operating normally before leaving the laboratory.
- Inspect seals regularly for deterioration and decontaminate the inside and outside of the cups or buckets. Replace as needed.
Recommendations
-
Use plastic centrifuge tubes than glass tubes. Plastic tubes are cheaper and more durable, especially in high-speed setting. It also comes in different colors, making it easier to label and organize.

-
Use adapters to fit tubes into the bores. Unfit tubes may slip out into the holes and may cause breakage and imbalance during the centrifugation process.

- For safe containment, load and unload the rotor in a biological safety cabinet. If a tube breaks or leaks, wait for 30 minutes before opening the centrifuge or aerosol to let the aerosols settle.
- If there is a spill of infectious material, wait for 10 minutes after the rotor stops before opening the lid. Perform decontamination by using 70% ethanol or 10% bleach solution. Remember that only properly trained personnel can check the O-rings on the rotor.


Esco Lifesciences offers an excellent choice for high performance centrifuge with a wide range of accessories to choose from. From product training to high-quality services, Esco ensures that the exceptional condition of your laboratory centrifuge is maintained.
Upgrading your laboratory centrifuge? Check the buttons below!
Read more: Centrifuge Services, What are the types and applications of a centrifuge